In this blog post we will configure :
- Jenkins server on Amazon Web Services
- Firewall for access
- Create an administrative user
Prerequisites:
- Basic knowledge of Jenkins
- Basic knowledge of Ubuntu
- Basic knowledge of AWS
- Setting up an Amazon Web Services account, if not please sign up, and for first time users you will be eligible for the free tier. The AWS Free Tier enables you to gain free, hands-on experience with AWS.
- Your Amazon EC2 Key Pairs are set up, if not please click here to follow Amazon’s walk-through on Creating a Key Pair Using Amazon EC2. This is needed for logging in into your AWS Ubuntu instance.
How To Launch an Ubuntu 18.04 Instance on AWS:
- We will first setup our Linux virtual server on the cloud (AWS).
- Login to AWS console, select EC2 service and click on launch instance :

- Step 1: Choose an Amazon Machine Image (AMI) Select the free tier eligible Ubuntu Server 18.04 LTS :

- Accept the defaults for Step 2: Choose an Instance Type and choose Next.
- On Step 3: Configure Instance Details, configure the VPC and IAM roles if any, otherwise accept the defaults.
- On Step 4: Add Storage, accept the defaults and click on next step.
- Its always a good practice to add some tags to your AWS resources, so add a tag here as Name – Jenkins Server on Step 5: Add Tags and click on next step.

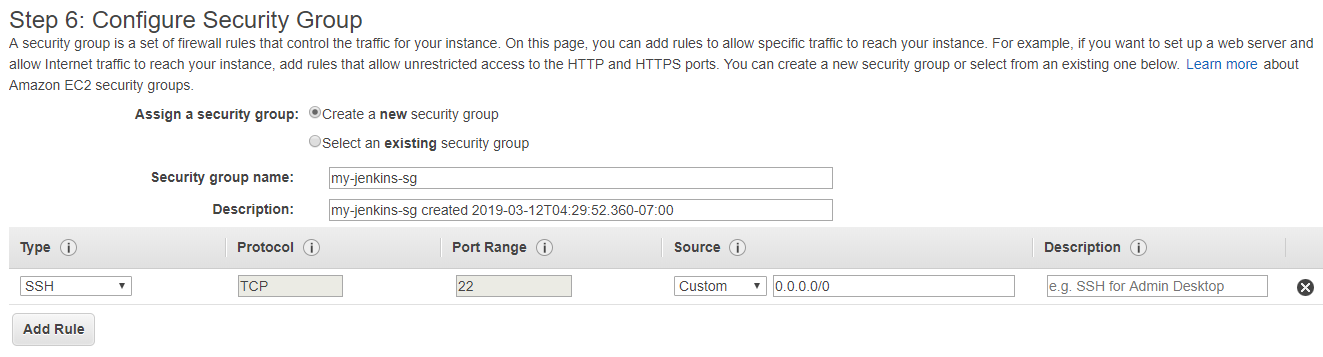
- On Step 6: Configure Security Group, choose create a new security group. Provide it some logical name, description and make sure that port 22 is configured to allow access to your instance. Finally, click on Review and Launch.
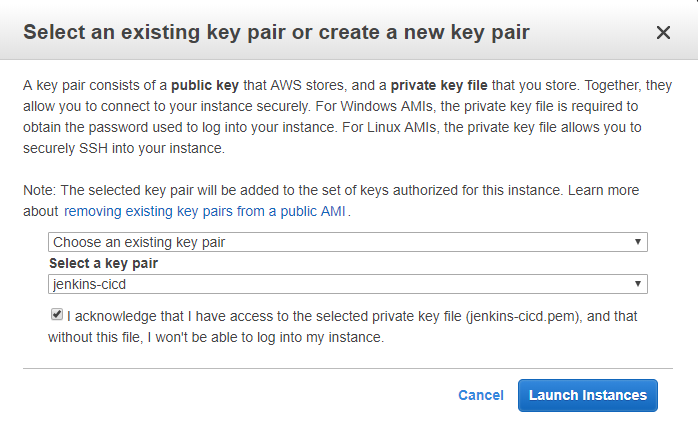
- On Step 7: Review Instance Launch, after you select Launch you will be prompted to Select an existing key pair or to create one. I have previously set up a key pair so I will select Choose an existing key pair and click on Launch.
- After you’ve launched your instance you can scroll to the bottom of the page and view your instance.
- Within few minutes, the instance should be up and running. If you are unfamiliar with how to connect to your instance, AWS gives you a brief tutorial on how to do so. In your EC2 console select Connect.
- You will be presented with the below guide on how to connect over SSH form both Linux and Windows machines.
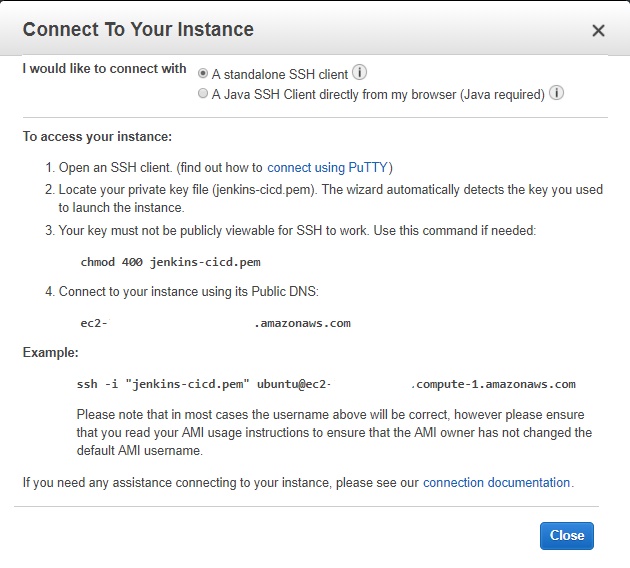
- Please note I have erased my VM’s public IP for security reasons.
Connect to our running AWS instance from the command line:
SSH into your instance with below command in your command line :
ssh -i "jenkins-cicd.pem" ubuntu@public-ip-address-or-public-dnsPass ‘yes’ if it prompts for confirmation :

That being done, we are now ready to install Jenkins on the AWS Ubuntu instance.
Installing Jenkins:
First, we’ll add the repository key to the system, run the below command from your terminal :
ubuntu@ip-10-0-1-8:~$ wget -q -O - https://pkg.jenkins.io/debian/jenkins-ci.org.key | sudo apt-key add -
OK
When the key is added, the system will return OK.
Next, we’ll append the Debian package repository address to the server’s sources.list:
ubuntu@ip-10-0-1-8:~$ echo deb https://pkg.jenkins.io/debian-stable binary/ | sudo tee /etc/apt/sources.list.d/jenkins.list
deb https://pkg.jenkins.io/debian-stable binary/
Let’s run a system update:
ubuntu@ip-10-0-1-8:~$ sudo apt-get update
Hit:1 http://us-east-1.ec2.archive.ubuntu.com/ubuntu bionic InRelease
Get:2 http://us-east-1.ec2.archive.ubuntu.com/ubuntu bionic-updates InRelease [88.7 kB]
.
.
.
Fetched 26.9 MB in 5s (5288 kB/s)
Reading package lists... Done
Now let’s install Java (must be installed first) and Jenkins :
ubuntu@ip-10-0-1-8:~$ sudo apt-get install openjdk-8-jdk jenkins -yAfter it has been installed successfully, we will start the jenkins service using the following commands :
ubuntu@ip-10-0-1-8:~$ sudo systemctl start jenkinsLets check the status of the service :
ubuntu@ip-10-0-1-8:~$ sudo systemctl status jenkins
● jenkins.service - LSB: Start Jenkins at boot time
   Loaded: loaded (/etc/init.d/jenkins; generated)
   Active: active (exited) since Tue 2019-03-12 16:58:04 UTC; 2min 14s ago
     Docs: man:systemd-sysv-generator(8)
  Process: 19595 ExecStart=/etc/init.d/jenkins start (code=exited, status=0/SUCCESS)

Mar 12 16:58:03 ip-10-0-1-8 systemd[1]: Starting LSB: Start Jenkins at boot time...
Mar 12 16:58:03 ip-10-0-1-8 jenkins[19595]: Correct java version found
Mar 12 16:58:03 ip-10-0-1-8 jenkins[19595]:  * Starting Jenkins Automation Server jenkins
Mar 12 16:58:03 ip-10-0-1-8 su[19641]: Successful su for jenkins by root
Mar 12 16:58:03 ip-10-0-1-8 su[19641]: + ??? root:jenkins
Mar 12 16:58:03 ip-10-0-1-8 su[19641]: pam_unix(su:session): session opened for user jenkins by (uid=0)
Mar 12 16:58:03 ip-10-0-1-8 su[19641]: pam_unix(su:session): session closed for user jenkins
Mar 12 16:58:04 ip-10-0-1-8 jenkins[19595]:    ...done.
Mar 12 16:58:04 ip-10-0-1-8 systemd[1]: Started LSB: Start Jenkins at boot time.
Next, we will configure the firewall settings. Jenkins runs on port 8080 by default, lets allow access to the port :
ubuntu@ip-10-0-1-8:~$ sudo ufw allow 8080
Rules updated
Rules updated (v6)
Check the status of the command we ran above :
ubuntu@ip-10-0-1-8:~$ sudo ufw status
Status: inactive
If you receive an inactive status after running the above command, run the below command to fix it :
ubuntu@ip-10-0-1-8:~$ sudo ufw enable
Command may disrupt existing ssh connections. Proceed with operation (y|n)? y
Firewall is active and enabled on system startup
Lets run the status command again :
ubuntu@ip-10-0-1-8:~$ sudo ufw status
Status: active

To                         Action      From
--                         ------      ----
8080                       ALLOW       Anywhere
8080 (v6)                  ALLOW       Anywhere (v6)
The Jenkins service is fully up and running but to initialize Jenkins and start using it we will have to setup our AWS security group accordingly, because our Jenkins server is on AWS we will need to expose port :8080 in our security group.
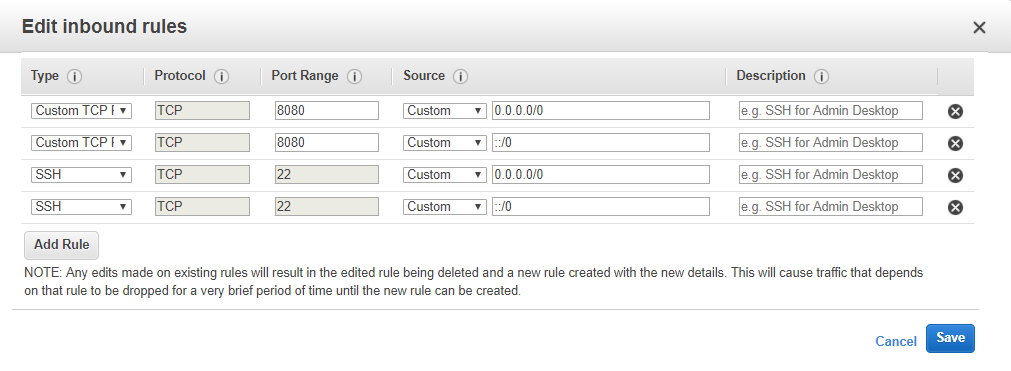
Lets jump back into the EC2 console view, select Security Groups from the left side scroll bar. Then select the my-jenkins-sg security group that we have created earlier and click on Edit inbound rules in the actions drop down like below :

Next, we will add two inbound rules (IPV4 as well as IPV6) to allow all TCP requests to port range 8080 :
NOTE: There is a possibility that your terminal session will be disconnected while changing security groups, if this occurs please reconnect using commands as told above.
To complete our installation, we’ll visit Jenkins on its default port, 8080, using the server IP address: http://public-ip-address-or-public-dns:8080
NOTE :The public IP address or public DNS can be found in the EC2 console page under Description section of an instance.
Once you have successfully navigated to your VM’s public IP address in your web browser you will be prompted to Unlock Jenkins.

Go back into your terminal session and run the below command for the initial password:
ubuntu@ip-10-0-1-8:~$ sudo cat /var/lib/jenkins/secrets/initialAdminPassword
1e615cfc655b4106a8243dfe1f28e670
Copy the password from your terminal and paste that password into the password field in your web browser and select Continue.
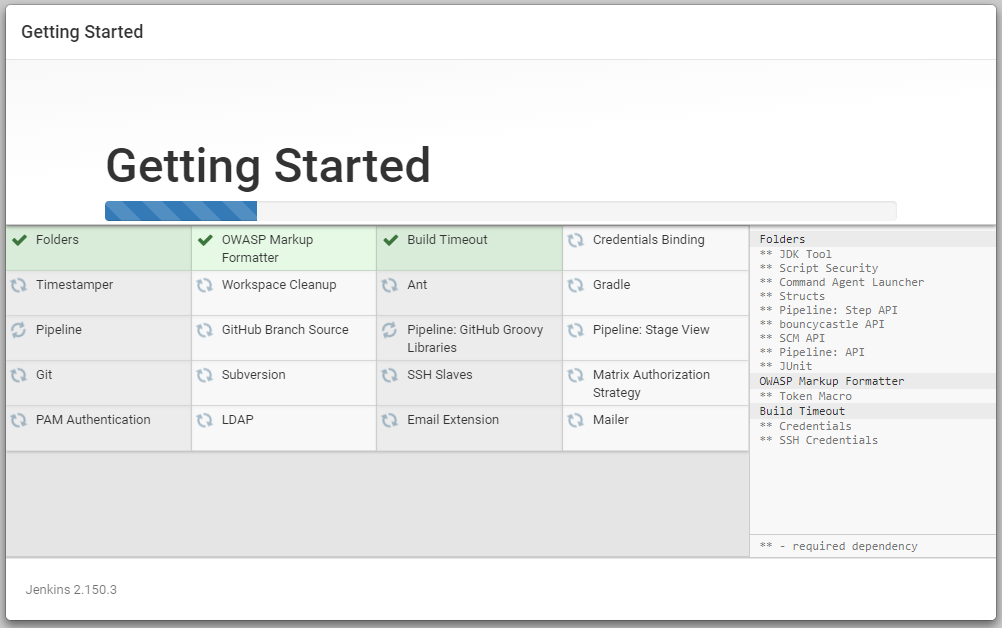
Select Install suggested plugins :

It will start installing all the suggested plugins :
NOTE : Sometimes the install suggested plugin option times out due to a possible reason mentioned here. So to fix it we will type the following command to find out the
pluginSetupWizard.js file on the Ubuntu instance.
ubuntu@ip-10-0-1-8:~$ sudo find / -name pluginSetupWizard.js
/var/cache/jenkins/war/jsbundles/pluginSetupWizard.js
Then, we will update the value :
// default 10 seconds for AJAX responses to return before triggering an error condition
var pluginManagerErrorTimeoutMillis = 10 * 1000;
with
// default 10 seconds for AJAX responses to return before triggering an error condition
var pluginManagerErrorTimeoutMillis = 180 * 1000;
To do so in command line we can use any command line text editor like vim or nano.
ubuntu@ip-10-0-1-8:~$ sudo nano /var/cache/jenkins/war/jsbundles/pluginSetupWizard.js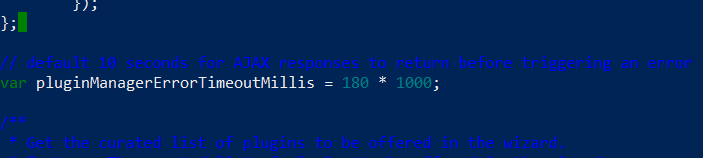
Restart the Jenkins service to apply the changes and try installing suggested plugins again.
ubuntu@ip-10-0-1-8:~$ sudo service jenkins restartWhen the installation is complete, you’ll be prompted to set up the first admin user. Go ahead and create the user.

Select Save and Continue.
It will then ask for Instance Configuration, accept the defaults and click on Save and Finish.
Jenkins is ready!

Perform your final click on Start using Jenkins.
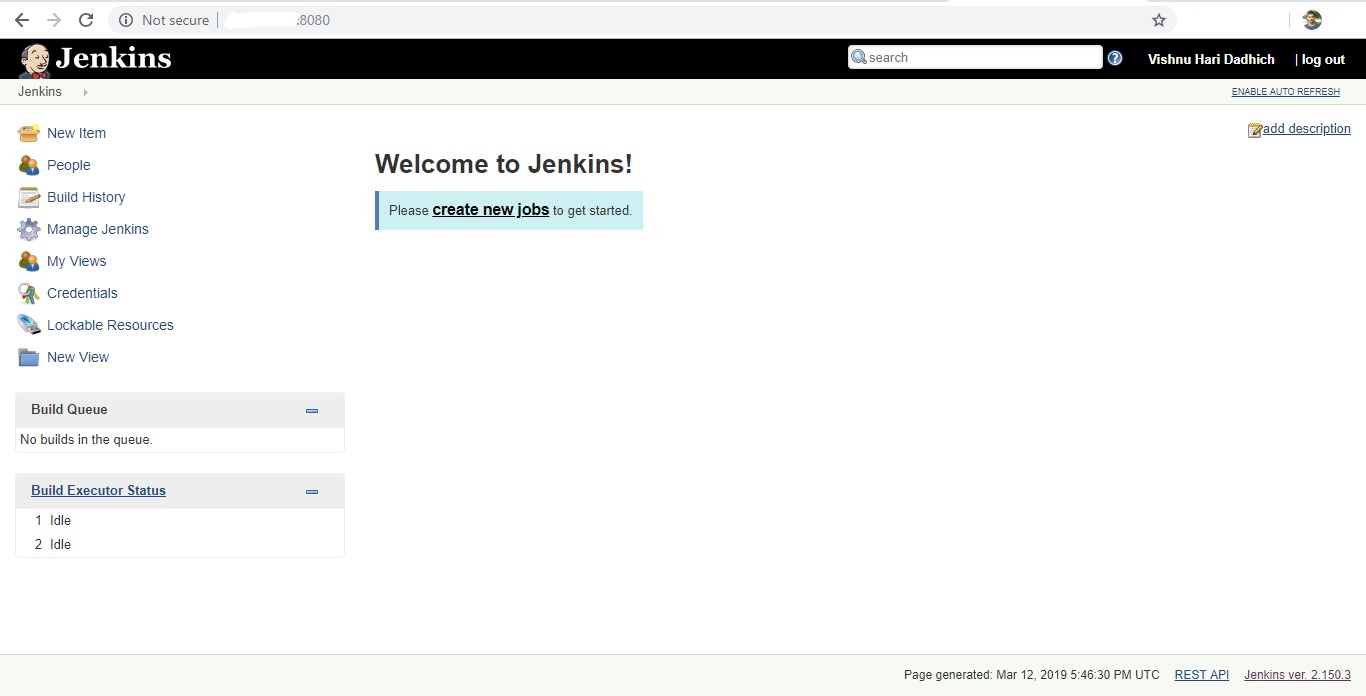
Jenkins has been successfully installed!!
In the upcoming posts, we will configure some free style as well as pipeline jobs.
Please let me know in case anything bothers and thank you for reading the post.

Thank’s!!!!!!!!
This post very helps me!!
LikeLiked by 1 person
Glad it helps! 🙂
LikeLike
Guys maybe I’m wrong, but dont forget to add rule to ufw to allow port 22 also…cause if you don’t after restart I guess you won’t be able to login to your server using ssh… At least that what happned to me =\ but better change your ssh port for your security and dont forget to change settings in ufw and also in EC2 console => Security Groups inbound options add your new changed ssh port to the rules.
LikeLike
Thanks for your comment, it helps a lot.
LikeLike
Insted of :
wget -q -O – https://pkg.jenkins.io/debian/jenkins-ci.org.key | sudo apt-key add –
you need to use:
wget -q -O – https://pkg.jenkins.io/debian-stable/jenkins.io.key | sudo apt-key add –
OR else you will get this ERRORS, while type:
sudo apt-get update
Reading package lists… Done
W: GPG error: https://pkg.jenkins.io/debian-stable binary/ Release: The following signatures couldn’t be verified because the public key is not available: NO_PUBKEY FCEF32E745F2C3D5
E: The repository ‘https://pkg.jenkins.io/debian-stable binary/ Release’ is not signed.
N: Updating from such a repository can’t be done securely, and is therefore disabled by default.
N: See apt-secure(8) manpage for repository creation and user configuration details.
LikeLike
Thanks, let me update the post.
LikeLike
This is a great article, Thanks for sharing this.
If you have ever encountered an issue with not connecting the Jenkins server from a remote PC, the below article might help you.
https://techiewheel.blogspot.com/2022/02/why-i-cannot-access-jenkins-server-from.html
LikeLike